标签搜索


搜索到
32
篇与
的结果
-
 LXC下Debian 12安装之后root登录,修改源,设置中文环境支持 ROOT登录默认情况下,root 的 ssh 远程 shell 访问被拒绝。按照以下说明为 root 帐户启用 SSH 登录。使用 nano 或您喜欢的任何文本编辑器以管理权限打开 /etc/ssh/sshd_config 文件。nano /etc/ssh/sshd_config在此文件中,找到并更改以下行:更改自:#PermitRootLogin prohibit-password到PermitRootLogin yes完成这项工作的快速方法是使用 sed 命令,如下所示:sed -i 's/#PermitRootLogin prohibit-password/PermitRootLogin yes/' /etc/ssh/sshd_config完成此更改后,保存文件,然后重新启动 SSH 服务以使更改生效。systemctl restart ssh默认情况下,系统未设置 root 密码,当尝试以 root 用户身份进行 SSH 登录时,会出现错误消息Permission returned,please try again。因此我们需要设置root的密码。出现提示时输入当前用户密码,然后输入新的 root 密码:passwd root [sudo] password for linuxconfig: Enter new UNIX password: Retype new UNIX password: passwd: password updated successfully确保您的防火墙还允许端口 22(SSH 的默认端口)上的传入连接。ufw allow ssh最后,您可以使用 root 用户帐户登录 SSH。$ ssh root@debian安装 Debian 12Debian 12可以直接下载ISO镜像安装通过Debian 11升级安装。更新现有的软件至 Debian 11 的最新版本:apt-get update apt-get upgrade更换为国内镜像源把 /etc/apt/sources.list 里面的内容全部注释掉,增加以下 Debian 12 的软件源:国内常见镜像站点Debian全球镜像站列表:https://www.debian.org/mirror/list 。下面列出国内常用的镜像站点及 /etc/apt/sources.list 中的具体对应内容:阿里云镜像站deb https://mirrors.aliyun.com/debian/ bookworm main non-free non-free-firmware contrib deb-src https://mirrors.aliyun.com/debian/ bookworm main non-free non-free-firmware contrib deb https://mirrors.aliyun.com/debian-security/ bookworm-security main deb-src https://mirrors.aliyun.com/debian-security/ bookworm-security main deb https://mirrors.aliyun.com/debian/ bookworm-updates main non-free non-free-firmware contrib deb-src https://mirrors.aliyun.com/debian/ bookworm-updates main non-free non-free-firmware contrib deb https://mirrors.aliyun.com/debian/ bookworm-backports main non-free non-free-firmware contrib deb-src https://mirrors.aliyun.com/debian/ bookworm-backports main non-free non-free-firmware contrib腾讯云镜像站deb https://mirrors.tencent.com/debian/ bookworm main non-free non-free-firmware contrib deb-src https://mirrors.tencent.com/debian/ bookworm main non-free non-free-firmware contrib deb https://mirrors.tencent.com/debian-security/ bookworm-security main deb-src https://mirrors.tencent.com/debian-security/ bookworm-security main deb https://mirrors.tencent.com/debian/ bookworm-updates main non-free non-free-firmware contrib deb-src https://mirrors.tencent.com/debian/ bookworm-updates main non-free non-free-firmware contrib deb https://mirrors.tencent.com/debian/ bookworm-backports main non-free non-free-firmware contrib deb-src https://mirrors.tencent.com/debian/ bookworm-backports main non-free non-free-firmware contrib网易镜像站deb https://mirrors.163.com/debian/ bookworm main non-free non-free-firmware contrib deb-src https://mirrors.163.com/debian/ bookworm main non-free non-free-firmware contrib deb https://mirrors.163.com/debian-security/ bookworm-security main deb-src https://mirrors.163.com/debian-security/ bookworm-security main deb https://mirrors.163.com/debian/ bookworm-updates main non-free non-free-firmware contrib deb-src https://mirrors.163.com/debian/ bookworm-updates main non-free non-free-firmware contrib deb https://mirrors.163.com/debian/ bookworm-backports main non-free non-free-firmware contrib deb-src https://mirrors.163.com/debian/ bookworm-backports main non-free non-free-firmware contrib华为镜像站deb https://mirrors.huaweicloud.com/debian/ bookworm main non-free non-free-firmware contrib deb-src https://mirrors.huaweicloud.com/debian/ bookworm main non-free non-free-firmware contrib deb https://mirrors.huaweicloud.com/debian-security/ bookworm-security main deb-src https://mirrors.huaweicloud.com/debian-security/ bookworm-security main deb https://mirrors.huaweicloud.com/debian/ bookworm-updates main non-free non-free-firmware contrib deb-src https://mirrors.huaweicloud.com/debian/ bookworm-updates main non-free non-free-firmware contrib deb https://mirrors.huaweicloud.com/debian/ bookworm-backports main non-free non-free-firmware contrib deb-src https://mirrors.huaweicloud.com/debian/ bookworm-backports main non-free non-free-firmware contrib清华大学镜像站deb https://mirrors.tuna.tsinghua.edu.cn/debian/ bookworm main contrib non-free non-free-firmware deb-src https://mirrors.tuna.tsinghua.edu.cn/debian/ bookworm main contrib non-free non-free-firmware deb https://mirrors.tuna.tsinghua.edu.cn/debian/ bookworm-updates main contrib non-free non-free-firmware deb-src https://mirrors.tuna.tsinghua.edu.cn/debian/ bookworm-updates main contrib non-free non-free-firmware deb https://mirrors.tuna.tsinghua.edu.cn/debian/ bookworm-backports main contrib non-free non-free-firmware deb-src https://mirrors.tuna.tsinghua.edu.cn/debian/ bookworm-backports main contrib non-free non-free-firmware deb https://mirrors.tuna.tsinghua.edu.cn/debian-security bookworm-security main contrib non-free non-free-firmware deb-src https://mirrors.tuna.tsinghua.edu.cn/debian-security bookworm-security main contrib non-free non-free-firmware中科大镜像站deb https://mirrors.ustc.edu.cn/debian/ bookworm main contrib non-free non-free-firmware deb-src https://mirrors.ustc.edu.cn/debian/ bookworm main contrib non-free non-free-firmware deb https://mirrors.ustc.edu.cn/debian/ bookworm-updates main contrib non-free non-free-firmware deb-src https://mirrors.ustc.edu.cn/debian/ bookworm-updates main contrib non-free non-free-firmware deb https://mirrors.ustc.edu.cn/debian/ bookworm-backports main contrib non-free non-free-firmware deb-src https://mirrors.ustc.edu.cn/debian/ bookworm-backports main contrib non-free non-free-firmware deb https://mirrors.ustc.edu.cn/debian-security/ bookworm-security main contrib non-free non-free-firmware deb-src https://mirrors.ustc.edu.cn/debian-security/ bookworm-security main contrib non-free non-free-firmware设置完成后更新apt-get update apt-get upgrade -y设置中文支持安装语言包: 首先需要确保系统中已经安装了语言包。可以使用 apt 工具来安装:apt install locales配置 locale: 接下来需要配置系统的 locale 设置。运行以下命令打开 locale 的配置界面:dpkg-reconfigure locales在出现的列表中选择 zh_CN.UTF-8(使用上下箭头来移动,并使用空格来选择)。然后在下一个界面中选择 zh_CN.UTF-8 作为默认的 locale。安装中文字体: 你可能还需要安装一些中文字体。以下是一些常用的中文字体包apt install fonts-wqy-microhei fonts-wqy-zenhei xfonts-wqy配置输入法: 如果你需要输入中文,你还可以安装并配置一个中文输入法。常用的中文输入法包括 Fcitx、IBus 等。以下是安装 Fcitx 和搜狗拼音输入法的示例:apt install fcitx fcitx-sogoupinyin fcitx-config-gtk安装完成后,你可以通过系统设置来配置输入法,或者运行 fcitx-config-gtk 来打开 Fcitx 的配置界面。确保终端的编码正确: 如果你是使用的终端远程连接到服务器,需要确保终端的编码方式也为 UTF-8 ,否则会出现中文乱码。重启系统或重新登录: 一般来说,在完成以上配置后,重启你的系统或重新登录即可看到中文环境已经生效。
 -
WG 配置文件 [Interface] Address = 192.168.100.2/32 # 对应 macOS 客户段分配的 IP PrivateKey = qJHywBpl27Ao/TRse85DQ/f+kwfNGRmPDYCq0OC6uUY= DNS = 192.168.1.3 # 本地的 DNS 服务器或者公有 DNS 服务器,例如: 114.114.114.114 [Peer] PublicKey = u7vjXN90uJt7pRjG8tR7hb25ssYOi7PRzJ5h9Diy02I= AllowedIPs = 192.168.1.0/24, 192.168.100.0/24 # macOS 如上设置可与 ClashX Pro 共存仅代理局域网,互联网走本地网络. # iPhone iPad 设置为 0.0.0.0/0 全局则模式. PresharedKey = Pu5xBEBmz9ghhUMNp5o72s+w7nuLwxJJUgNk3EljFVo= # 预共享密钥 Endpoint = ddns.xxxxx.com:12345 PersistentKeepalive = 25cat sharekey N1sHXS6eq7cQlsP0ccWlpWtDW6w1q/Kq4qkUk702nKg= cat server_privatekey OO06EsmBf0WZ+6zmlU/bLKJRi2+ZcM+UaFa2RbqConw= cat server_publickey SeiBLPh1buEVu3HnnMVB5iCUqaGjTrZqeDiSKIwNLGU= cat office_privatekey iLOHs9pvlJMBYeW4HvVTVtEbO7GKavPbj6jepWltbX4= cat office_publickey HdLZLNERJ/3H0oE7QhFrrKkthMNc6BCg8cAABwXxqQw=https://www.ioiox.com/archives/143.html/comment-page-1
-
LXC直通核显 LXC核心显卡直通,需要使用 PVE 宿主机的命令行修改 LXC 容器的配置文件。添加核心显卡直通使用 nano 编辑容器对应的配置文件,容器ID 104对应的文件是 104.conf,路径是 /etc/pve/lxc/nano /etc/pve/lxc/104.conf打开后默认的配置如下:arch: amd64 cores: 2 hostname: frigate memory: 2048 net0: name=eth0,bridge=vmbr0,firewall=1,hwaddr=A6:43:11:F3:EE:78,ip=dhcp,type=veth ostype: ubuntu rootfs: local-lvm:vm-104-disk-0,size=8G swap: 512需要添加以下内容lxc.apparmor.profile: unconfined lxc.cgroup.devices.allow: a lxc.cap.drop: lxc.cgroup2.devices.allow: c 226:0 rwm lxc.cgroup2.devices.allow: c 226:128 rwm lxc.mount.entry: /dev/dri/card0 dev/dri/card0 none bind,optional,create=file lxc.mount.entry: /dev/dri/renderD128 dev/dri/renderD128 none bind,optional,create=file这些配置参数是针对 Linux 容器(通常是 LXC 容器)的一些安全和资源控制设置,用于限制容器内部的行为和访问。以下是每个配置项的作用解释:lxc.apparmor.profile: unconfined:该配置指定了 AppArmor(应用程序安全性配置框架)的配置文件名称,这里设置为 “unconfined”,用于允许容器内的进程具有更高的系统权限lxc.cgroup.devices.allow: a: 允许容器内的进程访问所有的 cgroup 设备。lxc.cap.drop: 此配置项为空,容器内的进程将继承主机系统的默认能力设置。lxc.cgroup2.devices.allow: c 226:0 rwm 和 lxc.cgroup2.devices.allow: c 226:128 rwm: 允许容器内的进程对设备号为 226:0 和 226:128 的字符设备节点拥有读、写和映射(rwm)的权限。用于允许容器内的进程访问特定的设备,如图形加速设备。lxc.mount.entry: /dev/dri/card0 dev/dri/card0 none bind,optional,create=file 和 lxc.mount.entry: /dev/dri/renderD128 dev/dri/renderD128 none bind,optional,create=file:将主机系统上的两个设备节点 /dev/dri/card0 和 /dev/dri/renderD128 挂载到容器内的相同位置,用于允许容器内的应用程序访问图形硬件加速功能,以便执行图形相关的任务修改完成后保存,启动 LXC 容器检查核显等容器启动成功后,进入容器,使用命令行检查 /dev/dri 路径下挂载的文件,card0和 renderD128 都正常ls /dev/dri/ card0 renderD128查看 PCI 也能看到核心显卡,说明挂载成功lspci | grep VGA 00:02.0 VGA compatible controller: Intel Corporation JasperLake [UHD Graphics] (rev 01)
-
PVE8 使用LXC运行OpenWRT 用虚拟机方式跑openwrt ,在内网没人下载东西的时候,它依旧会吃相当一部分cpu,所以还是用lxc方式合适,其性能就是你物理机的性能,另外lxc没有docker的层概念,所以非常适合运行这种独立的服务!LXC(Linux Containers)是Linux内核中的一个软件容器化工具,它提供了一种轻量级的虚拟化技术。与传统虚拟机相比,LXC的优点在于更快的启动时间、更少的资源占用以及更高的性能。用户可以使用LXC在Linux操作系统中创建多个独立的容器,每个容器都提供一个隔离的运行环境,与主机和其他容器完全隔离开来。在容器内,用户可以运行各种不同的应用程序和服务,例如Web服务器、数据库、文件共享等。由于LXC能够更加高效地利用系统资源,因此它已成为开发人员、测试人员、系统管理员和云计算提供商的首选工具之一。固件选择我直接使用官网固件:https://downloads.openwrt.org/如果链接不上可以使用国内镜像:中科大源 https://mirrors.ustc.edu.cn/openwrt/上交大源 https://mirror.sjtu.edu.cn/openwrt/SquashFS是一种只读文件系统,不允许对其进行写操作,它可以将多个文件和目录合并到一个文件中,从而提高存储空间的利用率,同时也可以提高对这些文件的访问效率。SquashFS文件系统具有高效的压缩和解压缩速度,支持很多不同的压缩算法,能够在存储和传输文件时减少网络流量和存储空间的占用,广泛应用于嵌入式系统、上传和下载镜像等场景。Rootfs是Linux系统启动时候使用的根文件系统,是指在文件系统概念中的根目录。它包含了Linux系统启动所必需的一些必要文件和目录,例如/etc、/proc、/bin、/sbin和/usr等。rootfs文件系统通常会以类似于ext4或SquashFS文件系统的形式储存于嵌入式系统或者云计算平台中,为Linux系统提供启动和运行的必要支持。由于rootfs文件系统在启动过程中是唯一可用的文件系统,在系统运行时,它也会被其他文件系统所覆盖。无论是 OpenWrt 官网下载,还是第三方打包的固件,必须是-rootfs.img、-rootfs.img.gz 或者 -rootfs.tar.gz 的文件 。-rootfs.img、*-rootfs.img.gz 需要解包后打包 。CT模板如果是 rootfs 格式(官网tar.gz后缀的文件)打包的固件,直接下载后,在web界面上传至 PVE CT 模板目录即可,或者直接ssh登录PVE主机内下载。wget https://downloads.openwrt.org/releases/23.05.2/targets/x86/64/openwrt-23.05.2-x86-64-rootfs.tar.gz #PVE8下载的CT模板都保存在/var/lib/vz/template/cache mv openwrt-23.05.2-x86-64-rootfs.tar.gz /var/lib/vz/template/cache其他格式需要先解包重新打包使用。以下以 *.img.gz 固件包为例:cd workspace mkdir openwrt # 文件名 img_name="openwrt-x86-64-generic-squashfs-combined.img.gz" # gzip 解压出 img gzip -d "$img_name" # 去除变量 gz 后缀 img_name=$(basename "$img_name" .gz) # 挂载偏移 root_partition=$((`fdisk -l "$img_name" | grep .img2 | awk '{print $2}'` * 512)) # 挂载到 openwrt 目录 mount -o loop,offset=$root_partition "$img_name" ./openwrt # 打包 cd openwrt && tar zcf /var/lib/vz/template/cache/"$img_name".tar.gz * && cd .. # 卸载 umount ./openwrt另外一种方法apt install squashfs-tools unsquashfs openwrt-x86-64-generic-squashfs-rootfs.img 进入目录,重新打包为模板 cd squashfs-root tar zcf ../openwrt201117.rootfs.tar.gz *qcow2/vmdk如果原来镜像是 qcow2 vmdkqemu-img convert -p -f qcow2 -O raw op.qcow2 op.img qemu-img convert -p -f vmdk -O raw op.vmdk op.imgimg.gzgzip -d openwrt-01.10.2023-x86-64-generic-squashfs-combined.img.gz正在运行的虚拟机openwrt转lxc直接在pve web控制台点备份,选择 gzip格式 ,得到文件/var/lib/vz/dump/vzdump-qemu-100-2023_02_03-12_29_56.vma.gz在 local 备份里面 找到这个文件 点恢复 导入到一个新虚拟机 102qemu-img convert -p -f qcow2 -O raw /var/lib/vz/images/102/vm-102-disk-0.qcow2 op.img挂载和打包cd /var/lib/vz/template/cache mkdir op root_partition=$((`fdisk -l op.img | grep .img2 | awk '{print $2}'` * 512)) mount -o loop,offset=$root_partition op.img /var/lib/vz/template/cache/op cd op && tar zcf /var/lib/vz/template/cache/op.tar.gz * &&cd .. # 打包至PVE中LXC模板路径 umount op && rm -rf op #rm -rf 固件名称.img如果img是正在运行的系统且使用的Overlay模式,会丢失Overlay内容(恢复默认了)。你需要在原来系统里面 导出 后覆盖过来。创建一个CT/lxcpve目前依旧无法直接创建op的lxc,这里还是用命令行。pct create 109 local:vztmpl/openwrt-23.05.2-x86-64-rootfs.tar.gz --rootfs local:1 --ostype unmanaged --hostname CTOpenWrt --arch amd64 --cores 2 --memory 512 --swap 0 -net0 bridge=vmbr0,name=eth0 -net1 bridge=vmbr1,name=eth1,tag=85解释pct create 109 是pve里面CT或者VM的id值,你可以修改成你的local:vztmpl/openwrt-23.05.2-x86-64-rootfs.tar.gz 是上面你上传到rootfs的包名rootfs local:1 是本lxc储存位置(我的PVE已经删除了local-lvm)和硬盘占用大小限制1G 如果用其他地方储存可以参考实际配置,比如 rootfs local-lvm:1 rootfs local-brtfs:0.5ostype unmanaged 操作系统类型hostname OP 节点名称arch amd64 cpu平台cores 2 可占用的cpu核心数memory 1024 swap 0 内存和交换内存,建议关闭交换内存 也就是0net0 bridge=vmbr0,name=eth0 把pve的管理网桥给op用,也就是op把他作为 lannet1 bridge=vmbr1,name=eth1,tag=85 将连接光猫IPTV口的网桥给op,作为wan手动修改LXC配置nano /etc/pve/lxc/109.conf如果网卡不需要增加,就添加以下内容lxc.include: /usr/share/lxc/config/openwrt.common.conf lxc.cgroup2.devices.allow: c 108:0 rwm lxc.mount.entry: /dev/ppp dev/ppp none bind,create=file lxc.mount.entry: /dev/net dev/net none bind,create=dir lxc.cap.drop:如果要直通一个网卡进去lxc.include: /usr/share/lxc/config/openwrt.common.conf lxc.net.1.type: phys lxc.net.1.link: enx0023545ca007 lxc.net.1.flags: up lxc.net.1.name: eth1 lxc.cgroup2.devices.allow: c 108:0 rwm lxc.mount.entry: /dev/ppp dev/ppp none bind,create=file lxc.mount.entry: /dev/net/tun dev/net/tun none bind,create=file lxc.cap.drop:lxc.include 包含pve自带的op配置模板lxc.net.1 直通网卡enx0023545ca007进去作为 eth1lxc.cgroup2 的配置,这是lxc运行一些服务类的系统必须的lxc.mount.entry 挂载ppoe和tun到lxc内lxc.cap.drop: 取消 openwrt.common.conf 里面 对 cap的限制,不然openclash无法使用启动CTpct start 109OpenWrt 配置Attach 到容器内进行操作lxc-attach 109修改密码passwd # Changing password for root # New password: # Retype password: # passwd: password for root changed by root配置网络#编辑lan的IP vi /etc/config/network #重启网络即可登录 /etc/init.d/network restart或者这么配置uci set network.lan.ipaddr=[lan ip] uci set network.lan.gateway=[上级路由ip] uci set network.lan.dns=[上级路由ip] uci commit /etc/init.d/network restart (如果需要)映射宿主机目录 ,109是ID,最后mp=是LXC中目录地址pct set 109 -mp0 /mnt/bindmounts/shared,mp=/shared 安装argon界面,相关安装包luci-lib-xterm_git-24.217.56735-8015371_all.ipk taskd_1.0.3-2_all.ipk luci-lib-taskd_git-24.231.52046-6266f45_all.ipk luci-lib-xterm_git-24.217.56735-8015371_all.ipk luci-app-quickstart_git-25.033.56170-95d0213_all.ipk luci-app-store_0.1.14-2_all.ipk luci-app-istorex_git-25.050.51480-120b7dd_all.ipk quickstart_0.8.9-75_x86_64.ipk luci-theme-argon-master_2.2.9.4_all.ipk无法opkg update ,更新源出错,无法ping通www.baidu.com。但可以ping通baidu的实际IP断定为DNS没有解析,22.03版本可以直接ping通www.baidu.com。比对寻找原因未果。解决办法:修改host文件,解析源vi /etc/hosts opkg update opkg install luci-i18n-base-zh-cn容器lxc开启tun-br,可使用zerotier等# pve主机编辑lxc文件, vi /etc/pve/lxc/2001.conf ,最后加入 lxc.cgroup.devices.allow = c 10:200 rwm lxc.hook.autodev = sh -c "modprobe tun; cd ${LXC_ROOTFS_MOUNT}/dev; mkdir net; mknod net/tun c 10 200; chmod 0666 net/tun" # 进入lxc执行,重启后生效 cd /dev mkdir net mknod net/tun c 10 200 chmod 0666 net/tun reboot部分情况下 udp无法转发需要PVE系统加载 xt_TPROXY 模块。在PVE系统下执行改命令后重启。echo 'xt_TPROXY' > /etc/modules-load.d/tproxy.confNAT 环回 无效别名主机别名主机可以在 openwrt 网络 -> dncp -> 主机名映射的地方 添加域名到对应的内网机器ip上。然后清理本地dns缓存后即可访问。也可以在openwrt里面运行uci add dhcp domain uci set dhcp.@domain[-1].name='nas.leiyanhui.com' uci add_list dhcp.@domain[-1].ip='10.1.1.50' uci commit dhcp /etc/init.d/dnsmasq restart自定域名解析如果你有使用adguardHome 之类的自建dns,可以在dns内添加对应的域名解析记录到内网ip。或者修改需要访问的的电脑的hosts文件。参考链接:https://dev.leiyanhui.com/openwrt/lxc-mian-op/https://dev.leiyanhui.com/openwrt/pve-lxc-install-op/https://molezz.net/proxmox-pve-kvm-ct-lxc-openwrthttps://wayjam.me/posts/allinone-install-lxc-openwrt/https://www.right.com.cn/forum/thread-8352956-1-1.html
-
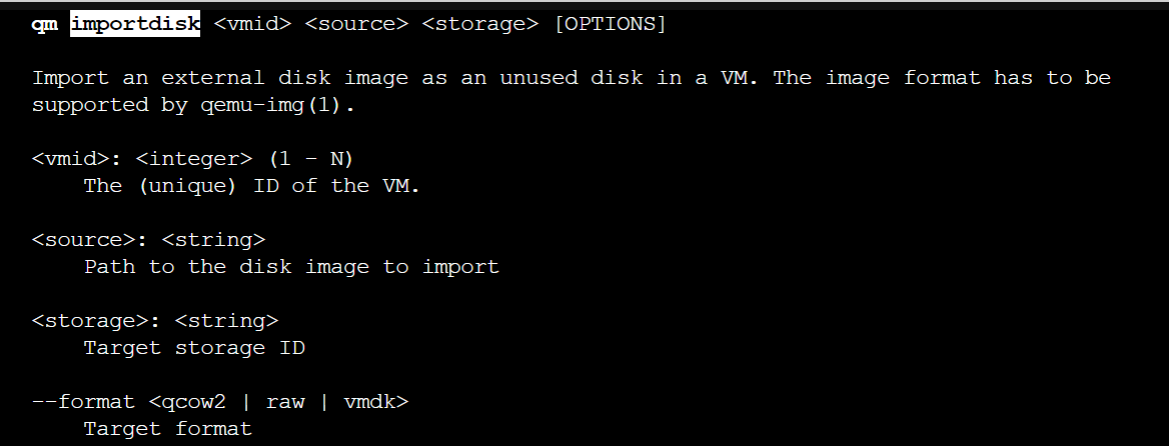
PVE 引入img文件作为虚拟机磁盘 下载openwrt映像文件,一般是gz压缩格式wget https://mirrors.ustc.edu.cn/openwrt/releases/23.05.2/targets/x86/64/openwrt-23.05.2-x86-64-generic-ext4-combined.img.gz解压缩使用gzip -d命令,文件解压后源文件自动删除。gzip -d openwrt-23.05.2-x86-64-generic-ext4-combined.img.gz将img格式转换为qcow2qemu-img convert -f raw -O qcow2 openwrt-23.05.2-x86-64-generic-ext4-combined.img vm-108-disk-0.qcow2导入虚拟机命令qm disk import <vmid> <source> <storage> [OPTIONS]。其中vmid指虚拟机id,source指img文件的位置,storge指pve的本机可以存储disk image的位置 --format指定要转换成的目标格式。qm importdisk 108 vm-108-disk-0.qcow2 local --format qcow2